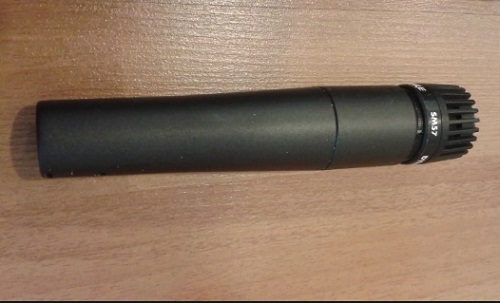
Throughout the music world, if we speak about both audio engineers and musicians, it is well known that Shure SM57 is an essential piece of equipment. It is a much-loved piece of gear among professionals because of its sound quality, durability, and versatility, but also for amateurs due to its incredibly affordable price.
Shure SM57 is a dynamic mic with unidirectional (cardioid) polar pattern.
It captures only the sound source which is aimed direct while rejecting other sounds and noises from the side and behind it. This ability makes it an incredibly good choice for live performance, especially for micing drums. Many drummers use SM57 because it can handle very loud sound pressure level (150 SPL) and capture and produce sound without distorting. I found that the official Shure answer to the question “What is the max sound pressure level this mike can take before distortion?” was “Over 180 dB SPL – like the sound of the Space Shuttle launch at a close distance.” Pretty incredible, right? That means if you can scream into your SM57, it will handle it like a boss.
That’s the good points, however, this model does have one flaw. As I said earlier, it doesn’t require phantom power, but it requires a lot of gain from your preamp when you are recording lower sounds, which can increase unwanted noise. To avoid this, feel free to bring your Shure SM57 as close to the sound source as possible.
Microphone Placement
Microphone placement might be one of the most important things while recording any kind of sound. Look at it this way; your microphone is your ear; where you want to stand to hear the best of the sound source? It’s a matter of your personal taste… There are no written rules where to exactly place the microphone while recording, but there are some suggestions which can be useful for you to know.
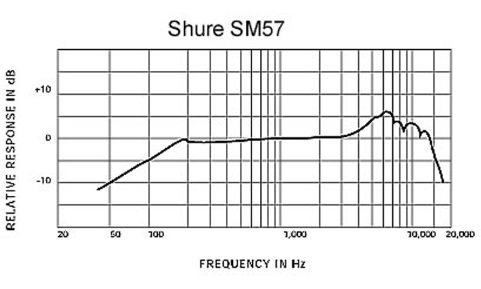
Like any other microphone, SM57 can give countless different results depending on where it is placed. Because of the proximity effect, even the best mic in the world will sound fat, boomy, bassy (name it however you want) if the sound source is too close. Also, if you are recording too far away from sound source or off-axis (angled different way from the sound source) sound may be miserable. In this case proximity effect with SM57 could be your best friend. Since it boosts 6 to 10 dB at 100hz, when the sound source is less than 6 mm (1/4 in.), it will significantly provide you with warmer and richer bass.
Every regular mic, placed optimally for a recording, can capture pretty good and satisfying sound. After recording, that track, if treated properly with EQ, compressor, and other desired plugins, you can produce outstanding results. Even the best and most expensive microphone can give disastrous results just if not placed properly. Getting the best result with microphone placement takes a bit of time to experiment and practice. While it’s true that the chance of getting the best recording is greater with a high-quality microphone, it is good to know that sometimes quality and price don’t always correlate.
Guitar amps
A dynamic mic such as SM57 is mostly used for live sound because of its ability to reject noise and the way it is made. It can handle heavy usage, and a really high SPL (sound pressure level) than the other, non-dynamic mics. There are some good methods for mic positioning with which you can make a great recording such as:
From The Front
Placing the microphone closer to the center of the speaker should give a brighter and cleaner sound while moving it further away or angling it toward the speaker will make your amp sound warmer. Start with your mic aimed at the center of your cabinet moved an inch back from the speaker cone.
Moving the mic even closer to the grill will increase the level of low frequencies and will reduce the cabinet’s influence to the overall sound. To get more of the room tone and the cabinet’s influence of the sound, try to move back your microphone a few inches more from the speaker. This position will probably provide you with the highest frequencies.
If you decide to record with less high frequencies and more warmth, move your SM57 sideways. And keep in mind you move in just one-inch increments because even a small increment can make a big difference in sound.
Front And Back
If you have an open-backed amp, one mic on the front and another mic from the back side of the cabinet will produce a very interesting tone. Be aware that phase may occur with this way of recording once when you mix these two tracks. To avoid phase in your mix for this particular situation, after recording, you should process one of the mics (I suggest a rear one) through a short delay (it should be less than 3 milliseconds).
At An Angle
Try to put your mic at an angle from top to center of your speaker or from the mic on the floor pointed at the center. The floor will produce more vibrations and because of that you will achieve more bass frequencies and specific tone depending on your floor material (wood, carpet…) Of course, you can do the same but from any side, left or right. Well really from anywhere if it will capture a sound that you like.
Lean The Amp
If you think that previous techniques eats your sound, for example, floor makes too many vibrations and therefore bass frequencies are increased, we suggest you to try leaning the amp back and aim your mic at the center of the speaker (as usual). Some amplifiers have “legs” for leaning or come with special stands for that purpose which completely isolates the amp from the floor. If your amp doesn’t have that ability, you should figure it out yourself how to do it. For example, you could lean it back on the chair. Just make sure that back side of your amp, especially if open-backed, isn’t directly behind the wall because it will abnormally affect bass response.
Drums
Every drummer, no matter how experienced, as well as the recording engineer will admit that this part can be very complicated. Before recording, or live performance, you need to know what kind of sound you want from your drums. Keep in mind that you should have one microphone for each component; it is not mandatory but is desirable. You wouldn’t believe in how many famous songs the drums were recorded with just a few microphones. Either way, with a higher number of microphones, your ability to further process each component increases, which means – better sound.
First of all, you need microphones which, above all, can handle a high SPL (sound pressure level) which makes the SM57 perfect choice for drums. The loud drum hits could cause distortion on other mics with lower SPL. So the high SPL, great rear rejection of noise and mid focused tone make the SM57 an amazing microphone for snare drums especially. You might also be interested in my other post about the sound level of drums.
Snare
The snare is usually miked four inches away from the edge of the snare drum and aiming at the center. The four inches rule can help keep the mic away from undesired harmonics from the hoop, the edge of the head, while making the SM57 safe and secure from stick hitting. Keeping a distance of your mic from the drum, will help avoid damaging it. Placing your mic further away from this position will import more ambiance into the sound and moving it closer will add low frequencies as a consequence of the proximity effect. This can be useful to a point, but on the other hand, if you get your mic too close, the sound will be unnatural. If the drummer is playing a cross-stick part, aiming the mic at the spot where the stick hits the rim can help achieve a stronger sound. Also, miking the bottom of the snare could be usable because it can work well when mixed in with the top snare microphone. It assists to catch some of the snare wires sizzle. Note that with this technique, a phase in your mix may also appear.
Kick
Believe it or not, it is possible and can be done. And why would it not be possible? Shure SM57 is as good as any other microphone and not only can this work, but it can also provide excellent results if the kick channel is EQ-ed properly. On the other hand, there are tons of different approaches and microphone placements which will deliver you completely different sounds of your kick drum. When u place your mic inside your kick drum, aim it at center close to the beating head, you will achieve that “dot” sound of your bass drum. If your mic is placed outside of your kick drum you will achieve the very low end of it, but this is possible only if you have a hole in the outer head which diameter is at least 6 inches. Yes, it is true that it matters if the hole is in the center or near the edge of the drum head, but that is completely different science. First of all, that is the matter of drummers taste and the sound he likes.
Toms
When micing the toms, the SM57 as a dynamic, unidirectional microphone is an excellent choice. Same as for snare drum, the rule of 4 inches would be a perfect placement and will provide you with the best sound of your toms. With outstanding noise rejection of SM57, you don’t need to worry about capturing many other sounds of your drums such as kick, another tom, snare or cymbals. Again, same as for snare, you can use another mic and place it below the tom to get the true warmness of the resonant head. With this Shure model, you can be sure that you will catch every frequency of your toms and that it will provide you signal without any distortion.
Hi-Hat
Hi-Hat is usually recorded with a small condenser mic, but SM57 can handle this job really well. You should mic the hi-hat from above, around 3 inches away from it and if there is a chance to point it away from the kit that would be perfect. You should take the proximity effect into consideration when recording cymbals. If you place your mic too close to the hi-hat it will sound dull. Even this can be EQ-ed, but I suggest you try to avoid it. Another mic placement to avoid is where the hi-hat is compiled. Air pressure when hi-hat is open/close can introduce some amount of noise and it can sound really strange.
Percussions
Percussion instruments like congas, bongos, tabla, can be miked same as any other drum. That means from above with a single mic placed between the drums to capture the sound of the both, or one mic for each drum. Unlike the bongos, tabla doesn’t have an open hole at the bottom and it is relatively quiet so you will need to get the mic in a bit closer. Using a mic with a tight cardioid pickup pattern for percussions on stage, such as Shure SM57 is a great option. If there is a chance for miking both the big and the small percussion individually, this would be perfect, because then you can better express its tonal qualities with separate EQ-ing. Place the mics between 2 and 4 inches from each head, angled slightly away from each other to get the better and defined tone. You might want to read my post on how to mic a cajon.
Check out my post on 101 Ideas for Church Sound Systems
Acoustic Instruments
This Shure worldwide favorite microphone is primarily made for helping audio engineers achieve great sound from acoustic instruments. Due to its marvelous characteristics, frequency response and high SPL, this lovely microphone is great for micing any acoustic instrument, such as acoustic guitar, trumpet, saxophone and the brass section in general.
Acoustic Guitar
Those without much experience of recording acoustic guitar, will say that you should place the mic in front of its sound hole. That makes sense because it is where the sound comes from, right? If you place your mic there, the only thing you can expect is a boomy sound fomr your guitar which will be difficult to process. On the other hand, placing the microphone as close to the guitar as possible can lead to different kind of results, for example, too much fret noise. A good place to mic your guitar is from around 5 inches away from it. Placing the mic 5 to10 inches away from the spot where fretboard and body meet each other usually captures the most natural sound.
Woodwinds & Brass
Sometimes, when placing the mic, a half an inch of distance in or out, or a couple degrees of angle change of the mic placement will significantly affect the captured sound. Close miking expands the sounds of valves, bows, hammers which are pretty unwanted in your recording. Also, harmonic content, mechanical noises, and sound pressure level change and rise considerably. There is a complete science about miking each wind instrument and the simplest explanation would be 10 inches from the sound source. Start with that and experiment. Find your own sound.
Vocals
Do not be surprised that the SM57 does not have to be strictly an instrumental microphone, by which it is best known. You should know that famous among singers SM58 has the same capsule as SM57. The main reason why you should own and use an SM57 is to have an additional spare vocal mic which can handle really loud singers. Some singers have such a powerful voice which can easily overwhelm your condenser mic, although they are often used as vocal microphones for choirs. The SM57 for vocals with no exception can be the best choice for rock, rap vocals and for voice actors also. You may lose some of the clarity of a condenser, but you can have a solid natural recording which will be without distortion.
General Rules:
- Place the microphone to the desired sound source as close as possible.
- Aim the microphone at the desired sound source and away from unwanted sources.
- Place the microphone really close to the sound source for an extra bass response.
- Try to use only one mic per sound source.
- Keep mic away from sound reflecting surfaces.
- Add a windscreen when using outdoors or for closeup speech
- Avoid extreme handling to decrease mechanical noise
- Use with a pop filter to avoid problems with sibilance etc
- Give attention ot mic and singer placement
FAQS
Does the Shure SM57 need phantom power?
Dynamic microphones sound a bit different than any other condenser mics and it do not require phantom power. So no, the SM57 doesn’t need phantom power supplied for it to work.
Will phantom power damage SM57?
Dynamic mics such as the SM57, which have a balanced output cannot be damaged by phantom power as the voice coil or ribbon is not connected to the mic ground. Mics with a balanced output could however be damaged by 48v phantom power.
Leave a Reply