The acoustic guitar is a wonderful sounding instrument. Probably because of that reason, it is one of the most used instruments around the world. You can’t imagine any songwriter worldwide without the piano, or an acoustic guitar in his hands. With its warm tone, it very successfully finds a place in many modern songs that we can hear every day on a radio or tv. As with any acoustic instrument, if you don’t record it properly you will have difficulty mixing. Don’t expect miracles in post-production. There is no plugin that will make your thin recording sound warm.
So rule number one, make the best possible recording for your conditions. Or as many fellow musicians and engineers like to say “get it right at the source”. The same rule applies to live performance. Improper micing will cause you poor sound. Luckily, there are also acoustic guitars with a built-in pickup (piezo), or some have magnetic pickups, so you don’t have to mess around with microphones, cables, stands. But the luck in an accident is that usually, such guitars sound hopeless so you should put a lot of effort to get the full and rich tone from it. Since this is a very wide topic, let’s go into a little more detail.
Live performance and recording
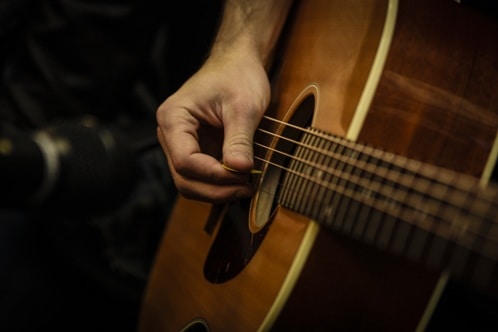
There are many methods to record your guitar. The sound hole of your acoustic guitar may seem like the most logical place to place the microphone, but if you try it you’ll see that it won’t work that good you think. Any microphone placed right in front will capture mostly rumbling bass frequencies while all the healthy tones will be smashed away with that bass. Dynamic mics have not proven to be the best in recording acoustic guitar, especially as they provide less high detail so we will need to boost the high frequency. If you are using only 1 mic in a controlled environment (I guess condenser one), for the real balanced tone, in other words, hot spot, place the mic about 10-15 inches away from the middle of the guitar. You might want to check out my post about headphone monitors for live performance.
This way will pick up the delightful and true, warm sound of your instrument without extra bass or even string noises. Also, if you have an option using 2 mics, that would be even better. You’ll be able to create a real stereo image that will provide you with wide sound in your mix. Another great option, if you have a built-in pickup, is to record DI output simultaneously with your mic. That way you’ll have 2 tracks and two sounds with which you can work on to make your guitar sound bigger. Ok, now all you need is to set up input gain on your sound card and hit record button in your DAW. Make sure there are no high peaks which can cause distortion on your recording. After you captured your perfect guitar track, let’s get to the mixing process.
Check out my other post – how to use a click track with in-ear monitors
EQ for your gear and environment
Since too many factors affect the final recording sound, such as mic model, mic placement, room, steel or nylon strings, playing style, guitar body, and so on, there is no way we can tell you exactly what you should do to improve the sound. Of course, I will give you some tips on how to get the most from doing equalization for acoustic guitar, do it yourself and get great results while mixing it, but you’ll need to practice. As time goes on you will gain experience, get better and better, and at the first listen you will know exactly what to do in certain situations.
It makes sense to adjust the sound of the guitar to sound the best it can, right? That is true, to some extent. If you set the eq to work best in “solo” mode, it doesn’t necessarily mean that it will be the best solution for a complete mix with other instruments. For instance, if you make it bassy with harsh high frequencies, it may happen that it won’t work well with bass in the song as well as with high details such as hi-hat or cymbals in general.
Let’s start with some very basic settings. A starting point would be a low cut (high pass filter). Cut all frequencies below 80 Hz, you won’t need these for sure. Frequencies from 0 to 60-70 Hz are considered as sub-bass so you won’t miss anything. If you isolate that area you’ll be able to hear only low bass rumble. With low-end cut you can go even up to 100Hz, depending on your guitar tone as well as the bass guitar and kick drum in your song (which works in that area) – click here to read about mixing a bass guitar. Now, let’s go to the upper frequencies. It may happen, due to your room shape, that you can find some of the 120 Hz to 150 Hz sound really awkward and nasty.
The same thing applies from mud between 150 Hz and 400 Hz as well as boxiness from 400 Hz to 1 kHz so. Prepare your ears as well as your EQ. The best way to find and modify these unnecessary tones is to boost one of the EQ frequency bands up to +10dB. Set the narrow Q, and sweep throughout the frequency spectrum while listening for areas that appear like feedback according to the rest. When you find the spot (or spots, there can be a couple of them), feel free to reduce it by 2 dB to even 5 dB. That should be enough. But remember, cut narrow, you don’t want to kill more of your tone than you should. Although, doing EQ for guitar doesn’t stop here. Now is the time to get some brightness.
If you recorded (hope you’re not) your guitar with a dynamic mic there could be a big problem with making your guitar shine and cut well through the mix. You can always bring up everything above 10kHz to the sky, but there is a risk of inserting a large amount of white noise. Applying noise reduction plugins such as iZotope’s rx7, or any other similar may help but only to some point. If your guitar sounds dull, try boosting a high shelf somewhere from 3 kHz and above while keeping the notice if there are any sharp notes that stab your ears. Mids, upper mids, and highs (1 kHz to 10 kHz) will define the presence of your mix, and if well balanced, you’ll get a great result.
Boosting above 10 kHz, even more, can add extra sparkle to your guitar. Try it. Play the complete mix while changing the volume of your guitar and see how it acts in the full mix. Also, mute and unmute it while playing, you’ll have a better idea of how much it contributes to your song.
Compression – Yes or no?
A compressor is a very useful plugin and should not be avoided, especially if you know how to use it the right way. If you are a beginner you should be extra careful with it, since if you do not know how to set the compressor, you can get catastrophic results. For example, lose the definition that hitting the strings sound can bring you. Considering the guitar is a natural instrument, has a wide dynamic capability, it should not be squeezed too much with a compressor. No one likes to hear the choked guitar flat sound.
Even if it is used just for background. Attack time shouldn’t be more than 20 ms. Release time must be fast to evade attacks from other notes. Around 100 ms (+/- 50) should do the job. The ratio is always a big question, yet, as I said, you don’t need a squeezed guitar in the mix, so keep it 2:1, 3:1, and the most 4:1. This setup will cut the large dynamic oscillation while keeping a natural tone. Another great trick is parallel compression (blending compressed track with original). Or if your compressor plugin has wet/dry knob or fader, that’s even better. Experiment with it. You can get a controlled signal with more life in it than just with a compressed track.
Panning
Oh yes, panning acoustic guitar track is as important as guitar eq, and balance. You’ve probably read a bunch of articles on the web, or watched hours of tutorials on youtube to find out what is the right way for this but just like for the rest, a personal taste is all that matters. You may find yourself very confused if you experiment too much and do not know exactly what you want to achieve. This is called decision fatigue and it is a normal thing. Things will fall into place when you let the mix settle for a day… or two.
We’ll reveal to you a few tricks on how you can give your acoustic guitar recording a wider sound, even if you’ve recorded it with just one microphone. You will most likely say something like: “Yeah I know how it’s done, I duplicate the recording, invert phase and pan one track left, another track right”. Sure, it can get the job done, but you won’t accomplish anything spectacular with it. It is very likely that you will achieve a wider image, as well as a better result, with the help of a regular stereo enhancer. And you won’t have to duplicate the track at all.
One of my favorite methods for a wider acoustic guitar sound is to duplicate track and move one of the tracks around 10 ms later. After that, choose the panning level you like. You may go for even 100L, 100R, literally whatever you feel is the best. If you like, you can make different EQs for both tracks, it will give extra flavor to complete image. That is it, great result, right? This method is awesome for rhythm guitar playing in the background. Yet what should I do with the main guitar parts in the song? I wouldn’t recommend you using this method for the solo part. Simply because when the solo guitar part is on, it should be in the main focus. That means in the middle. You can always fatten it up with an additional duplicated panned track, but the main guitar track should stay in the middle of the mix.
Another trick I use, but less frequently than the previous is basically the same thing but with one crucial difference. Sometimes, when I don’t feel it, I don’t move that 10 ms after the original track. Yes, I leave them playing at the same time but, on one track I apply low pass filter, for example at 1 kHz, while on another track I apply high pass filter at the same frequency. In that way, I get the low-end guitar on one track, and high end on another. Hard panning, in this particular case, won’t be that good choice, it may sound weird. But everything bellow 50% will do a great job. I hope that with these little tricks I made the mixing acoustic guitar a bit easier for you.
Effects
You can always add some spice some background guitar with modulation effects like chorus, but it is not necessary. While, on the other hand, reverb is more than desirable yet know that the same rule as for compression applies in this case also – the less is more! The reverb should be just a little spicy and add depth to the guitar, if you overdo it with a large amount of reverb you can throw the guitar far into the mix no matter how loud it is. The final result won’t sound good. Depending on the genre, add that much reverb so you are able to feel it, more than you can hear it.
Getting the right balance in the mix
Now when we get everything prepared for the final touch of mixing acoustic guitars let’s head on to proper volume adjustments. I’m sure you don’t want either too loud or too quiet guitar in your song. Just sometimes, but really rarely I didn’t reach for automatization track. It’s almost impossible to expect that player will play perfectly and that it will fit the mix 100% even you followed previous steps. This is not a nuclear science but requires some time and listening to the complete mix again and again. There is some kind of unwritten rule that I figured out on what instrument I should follow when mixing the guitar.
When you open your mixer window, pay attention to the kick drum and bass guitar meters. If you adjust your guitar track to play at the volume somewhere between kick drum and bass guitar you’ll notice that you found its perfect place. Of course, this rule applies only if the guitar plays its role as a backing instrument. If we speak about the solo part, volume reference for it should definitely be vocal track. I hope that with these little tricks I made the mixing acoustic guitar a bit easier for you. Now you can just sit back and enjoy your mix.
Live Performance
Messing with microphones on stage can be a headache so if there is a chance for an acoustic guitar with inbuild pickup, go for it. The same rules work as for mixing recorded guitar. However, regardless of whether you use a digital mix, somehow you will always be lacking an additional tweak. All in all, unfortunately, on live performances you usually don’t have much time to play with mixing guitars. Somehow the drums take the most time, and eventually, the guitars mixing is done along the way.
You’ll have to think fast, hit that lowcut button on your mixer, tweak gain reduction knob and start sweeping around Q knob on the mixer’s EQ to find that mid-range annoying sound. When you find it, lower it down and you are free to fine-tune everything else. Like adding some presence with high EQ knob, for instance, or lowering the bass. Again, it all depends on other instruments on stage.
Guitars and vocals
Perhaps, this is the most common variation of a live performance or studio recording, a vocal and guitar. Luckily, since we do not have a large number of different instruments, the mixing process will be much simpler. The only task is to make the guitar sound rich and full by applying the previous EQ tips with a small change. Now you only need to listen to the guitar to make it sound good on its own. Some of these tips also apply to mixing electric guitar and vocals too.
Since we don’t have a bass guitar in this case, we want to enrich the low end of our acoustic guitar. We still need a lowcut applied, but this time boosting frequencies from 80 Hz to 200 Hz will make the guitar sound warmer and more powerful. Cutting the frequencies around 3.5 kHz will make more space for vocals in the mix. Now only you need to do is add a bit reverb and find a great balance with the vocal.
Sources:
https://www.yamaha.com/en/musical_instrument_guide/acoustic_guitar/mechanism/
Leave a Reply