When it comes to sound, there are a lot of different components of audio equipment you need to have in order for it to work. For singing vocals and speech, you will need to connect a microphone to a speaker of some kind.
So can a mic be connected directly to a speaker? Well not really, unless you are using a powered speaker. Not only do you need speakers and a microphone, but also an amplifier to boost the mic output signal going into the loudspeaker.
The problem is that many people don’t know how to connect a microphone to an amplifier because they think the two devices can just plug into each other without any help from another component. This isn’t true at all; you can’t just plug a microphone directly into most audiopassive speaker. If you want your voice amplified so others can hear what you’re saying, then be sure to use an amplifier to take the mic signal and amplfy it to a speaker level signal that can be heard!
If you have passive speakers rather than active speakers(read about speaker differences), then you will definitely need an amp to boost the line level signal. If you are using active speakers then they will have their own internal amplifier. In this post we’ll go over the basics of connecting a microphone with an amp and everything else you might need!
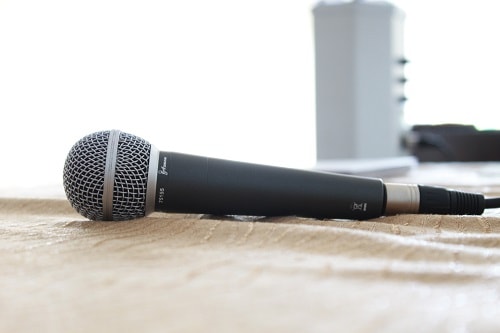
1. Microphone input
The first step is to connect your microphone and amp. With most amps, you’ll have two inputs that are labeled “mic” and “line-in” or something similar. If this is the case for yours, then plug one end of your cable into the mic inputs on the amplifier while connecting a XLR connector. An XLR plug has three metal prongs(male end), while an XLR input(female end) will have 3 holes to make the connection. You might also be interested in my post, what are XLR cables used for?
Some mics use a 1/4″ jack connector at both ends, and some have a 1/4″ jack at one end and an XLR at the other end. It’s important to match the input on your amplifier with the connector at your mic end.
Difference between passive and active microphones
In case you aren’t already aware, there are two main types of microphone, passive and active. Passive microphones are usually dynamic mics, which means they use a coil of wire to convert sound vibrations into electrical signals. The mic level signal will then be amplified by an external amplifier (one that’s not built in). A dynamic mic is most commonly used for vocals and singing live.
Active microphones can also work without an external amp; they have their own circuitry and require batteries or their own power supply to operate them. This type is usually known as a condenser microphone. Condenser microphones can be used for vocals too, but more often in the studio rather than for live performance. They can be used also for acoustic instruments such as guitar, violin or flute. The power supply they need is sometimes called phantom power, which is ususally supplied through the microphone inputs on a mixing desk or amplifier and travels down an xlr cable.
Bluetooth microphones
If you are using a bluetooth microphone, you might not have to set up an amplifier. This is because bluetooth microphones are powered by batteries and do not need a power supply or cable connection to work.
A bluetooth microphone will connect wirelessly with a bluetooth speaker, as long as everything is powered up and synched together. You may have to hold in a button on your amp to sync to the two devices together. Check the manual for your speaker if you are having trouble getting it to work. Read more about the best wireless mics.
2. Plug the speaker into the amplifier
Next, you will need to make sure that your speaker is connected to a power amplifier. The speaker will usually have an input for a RCA connector or a 1/4 inch jack. This is the type of cord that you would connect your TV or other devices too. Connect one end of this cable into the “speaker out” on the amplifier and then plug in both ends of the cables (red/white) into corresponding speaker input connector. If you have a stereo amp, it is best to connect up both speakers, rather than leave one unconnected.
It is important to use the correct cables and connectors for both your amplifier as well as your speaker. Not all speakers are compatible with each other, so it is best to consult their manuals or read online reviews before purchasing a new one in order to make sure they will work together properly. Click here if you want to read about how to know if you have a damaged speaker.
3. Turn on the amp and external power to mic if needed
Once you have everything connected up, it is now time to power everything up. Turn on the amplifier first and then turn on your mic, if it has an external power supply. If your speaker or mixer doesn’t have a built in 48 volt phantom power supply, then you will need to use an external power unit for this. You might also be interested to read my post on what is phantom power on a mixer.
4. Adjust the volume and sound settings
Now that you have everything ready to go, make sure you check your amplifier’s sound settings. Your mixer may have a built in tone generator and EQ that can be adjusted as well. You will want to use the mic input sensitivity switch on your amp or set it up manually if it doesn’t have one of these switches available.
If you find the sound is distorted, back the sensitivity off. Each mic will also have it’s own mic level signal and some will be stronger than others. This will determine how you adjust your gain and volume settings on your amplifier.
Leave a Reply