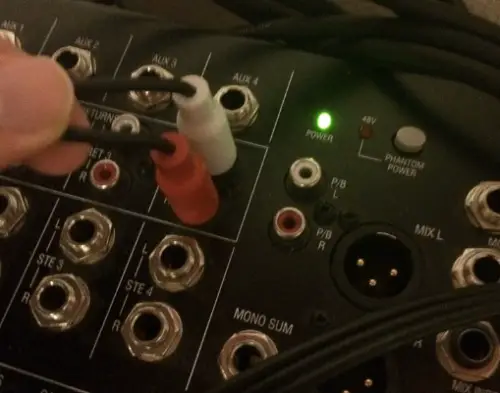
If you are new to using a mixing console, perhaps you have wondered what the 48v LEDs are for, or maybe you are aware of equipment that requires phantom power.
The short answer is:
Phantom power is +48V DC that’s sent to a condenser microphone through its balanced XLR cable. It receives power from and sends audio to a mixer (audio device) along the same wires. It’s known as “phantom” because the current doesn’t come through a separate wire.
Phantom power is used to supply current to electronics inside the condenser mic. These mics need power for their operation, as well as impedance converters, preamplifier circuitry and, in some cases, polarized microphone capsules. Phantom is a DC voltage ranging from 12 to 48 volts. In a condenser microphone, the transducer element has to receive electrical charge for it to convert sound waves into electrical energy.
A dynamic microphone by contrast doesn’t require power to make it work. Ribbon microphones are similar in many ways to dynamic mics, and most are passive, but there are some that do require power.
Phantom power applications:
• Sound consoles (analog/ digital)
• Microphone preamps
• Audio interfaces
• Stand-alone phantom power supplies
• Instrument amps with an XLR input
In all of these cases, the phantom power is at the female XLR input connector. It is a positive DC voltage on XLR pins 2 and 3. Pin 1 has 0 volts, and pins 2 and 3 have the same power. The cable shield is connected to the ground via pin 1. Pin 2 and 3 have a balanced audio signal.
Nearly all mixing consoles and audio interfaces provide phantom power at their mic input connectors, so you just plug the mic into the mixer and press the +48volt button to power it.
The three common types of use are 12, 24, and 48v (voltages).
The 12v and 24v varieties are fairly common in battery-powered portable mixers. These mixers meet significant limitations due to their power source. Studio consoles provide 48V phantom power to each individual signal input. As a result, many studio-oriented condensers need phantom power and are designed to operate at 48v. In fact, some mics operate only at 48v.
Even if a mixer provides phantom power for each microphone, you still need to pay attention. Some consoles don’t seem to be capable of providing 12mA (milliamps) of current per microphone across the board. Once you connect several mics, the phantom power supply may not be able to offer enough current to every one of them or it might just crash. This rather unpleasant risk can occur with cheaper consoles as well as battery-powered mixers. Therefore you need to know the current requirements of every mic you hook up with the mixer and also the total available from the mixer. Check out my other post 15 best products for small church sound systems here
Why condenser microphones require a phantom power supply
We will try to explain why condenser mics need power in order to work. Condensers are based on an electrically charged diaphragm assembly that forms a sound-sensitive capacitor (capsule). This capacitor (capsule) stores an electrical charge. Once the component is charged, an electrical field is formed in proportional size to the space between the backplate and the diaphragm.
When sound hits the capsule, the variation between the area produces an electrical signal that represents the sound detected. A transducer changes this energy from one type into another and in this case, acoustic energy into electrical energy.
The diaphragm and backplate may be charged in 2 ways:
– By an externally applied source (phantom power). This is named external bias or true condenser.
– By a permanently charged electret (a permanently polarized piece of dielectric material) material within the diaphragm or on the backplate. This way of charging is also known as electret condenser or internal bias.
Many modern condensers use a sort of mixer-provided phantom power. However, they will even be powered by an onboard battery or an exterior power supply. Never apply mixer-driver phantom power to a microphone that’s already using one of these different power sources.
Phantom power from an audio mixer
Now that we learned what phantom power is, let’s find out the way to properly use it. With the master faders turned down in the analogue or digital mixing desks, activate the phantom power. The on/off switch for this power source in many consoles is labeled “P48” which means “phantom power 48 volts”. It might be labeled “48V” or just “Phantom.” You must mute a mic channel and plug into that channel. This prevents a loud pop once plugging in the mic. You can unmute the channel and wait a couple of seconds for it to be absolutely powered.
Some mixers apply it to all input channels at once; in others, this power source is switchable on every input. That allows you to turn off the supply for ribbon mics as a safety precaution. Some mixers apply phantom to only a couple of channels, thus be aware of that if you can’t power up a mic.
Mics with inline on-off switches, generally short XLR pins 2 and 3 to mute the microphones. Since the identical power is on both pins, there’s very little or no pop once the pins are shorted along. If you hear a pop once switch the mic, the voltage is slightly different on the pins because of the resistor tolerance within the supply. Some on/off switches can short the pins over time. It can prevent pops. If you would like to block power in one channel, use block capacitors.
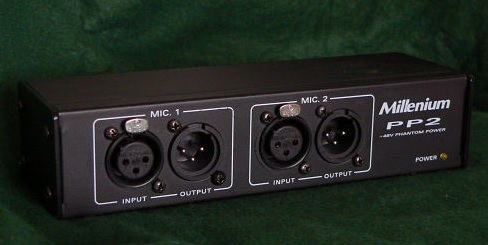
Stand-Alone +48 Volt Supplies
What to do if your mixer, microphone preamp, or instrument amp doesn’t have phantom power? Get an independent standalone power supply and plug it directly into the mixer with the microphone cable. Some of those supplies are AC-powered, some are battery-powered, and some are both. Some can supply just one microphone, while others can power several at the same time. Some supplies have a switch that selects 12v or 48v. Set it to 48v for additional headroom if the microphone is specified for 48 volts.
The phantom power supply usually has XLR input and output connectors, one pair per channel. Connect an XLR cable between the microphone and the supply’s input connection. Plug another microphone cable between the supply’s output connection and the mixer, preamp or instrument amp’s microphone input.
If the amp’s input connection could be a 1/4-inch jack (not an XLR) insert a transformer adapter between the supply output and the amp’s input jack. This encourages powering a condenser mic and plugging it into an instrument amp that doesn’t have a 48-volt supply. Some di-boxes can supply 48 volts if they have an external adapter.
FAQS
Can phantom power damage equipment? – some important cautions
Don’t plug a mic into an input where phantom is already switched on, you could hear a loud pop. If you have no other choice (as during a live performance), mute the mixer channel before you plug it in.
Make sure your power is sufficient for your microphones. Some mics begin to distort or lose strength if the voltage drops significantly below 48 volts.
To measure the phantom voltage at your mixer’s channel input, get a DC meter and measure between XLR pins 1 and 2. Do the same between pins 1 and 3.
Be aware of voltage sag. Microphones draw current through the supply’s resistors, which current causes a drop.
Power supplies are rated within the total number of milliamps they can provide. Check that the entire power drain of all the mics plugged into the supply doesn’t exceed the supply’s current rating.
Avoid having phantom in a patch bay (device or unit featuring a number of jacks) because someone is likely to patch in and cause a pop. If you need to patch into a jack with phantom on it, mute the input module that the mic is connected to, or turn down its fader. Mic-level patches should be avoided anyway.
Some supplies cause a hum after you plug in a connection that ties the shell to ground. Float the shell. This additionally helps to prevent ground loops. Since cables carry the DC come back, make sure the shield and solder connections are secure. Otherwise, you can expect crackle noises, especially once the cable is moved.
Leave a Reply